Naughty Christmas Wishes

It is that time of year once again! If you like to decorate with an, um, edge, this is just the thing for you! Click on the globe to shake things up.

Warning: The snow may not fly but you will get shaken up by this naughty snowman. Adult animations are involved. Enjoy!

Weighted Mesh Ankle Boots

I continue to experiment and play around on the mesh beta sims on the test grid. I finished the ankle boots I made to go with the peasant tunic and dress. Here are some pictures.

I thought the boots would be simple, but weighting the mesh was tricky because the buckles were in an area of movement. It took a lot of fiddling to get it right. It is all a learning experience.

Next I will attempt a men’s role play outfit.

Still playing with weighted mesh clothing!

I completed the skirt for to go with the tunic I blogged about a few days ago. I tried linking the skirt to the tunic, and that works perfectly, so even though it is made up of two mesh pieces, it is only one piece in my inventory that I need to wear, taking up only one attachment point.

The two pieces together total 32 prims at the moment. The Lindens continue to tinker with prim equivalencies, so I hope it will be fewer prims when mesh comes to the main grid. When I first uploaded the tunic, it came in as only 6 prims, and then it jumped to 14.

It took a lot of fiddling to get the weighting just right. The weighting provides some control over how the mesh deforms with the joints. It works perfectly for most poses. I tried a couple of extreme poses where a bit of leg poked through, so I included glitch pants. It won’t be 100% perfect for all poses, but I would say it is about 95%. Because most of the avatar beneath is alpha’d out, it will fit anyone. I experimented by moving appearance sliders to the extremes, and it works.

My next attempt will be a pair of boots.

Playing with Weighted Mesh Clothing

I have been playing with mesh in the open beta test of mesh import on the Second Life test grid for the past three weeks.

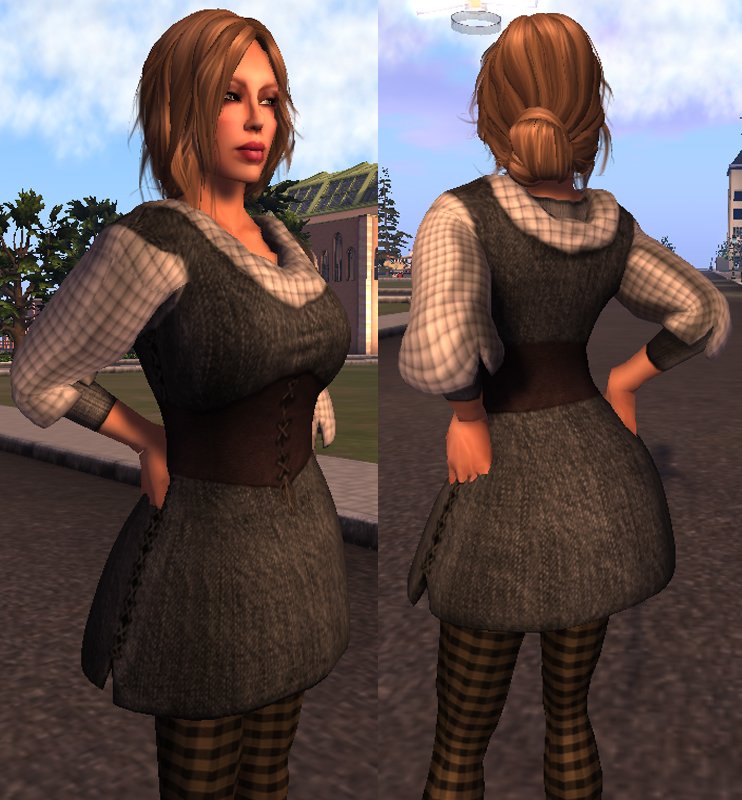
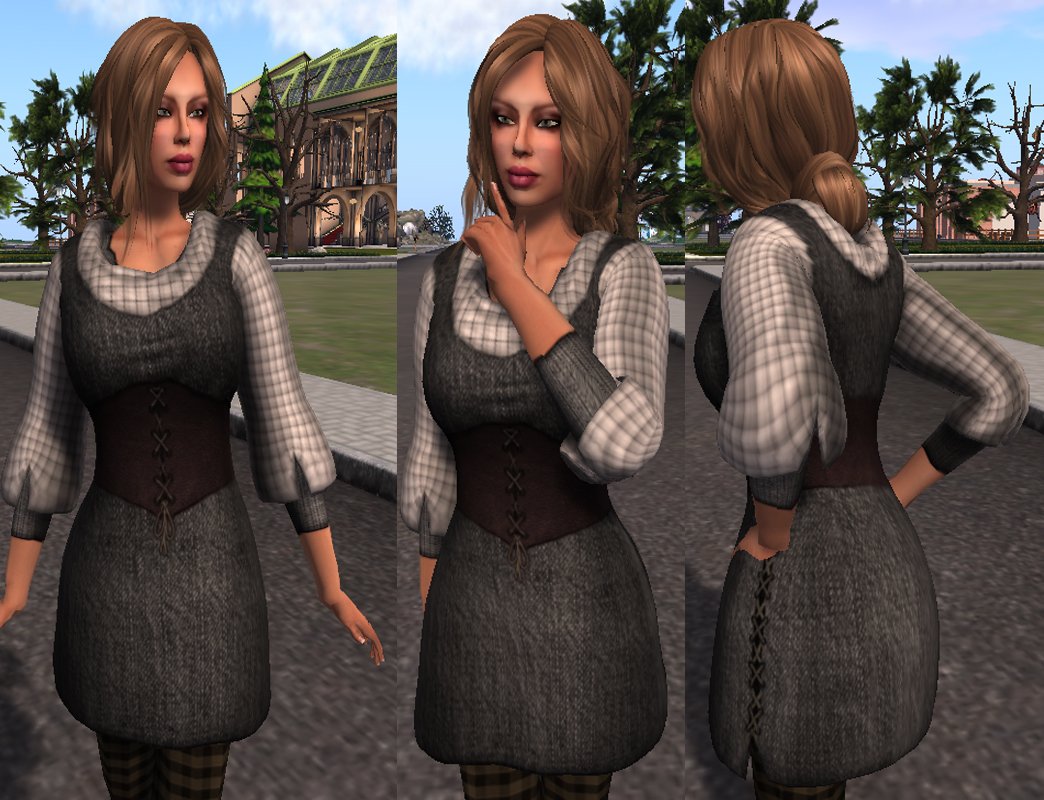
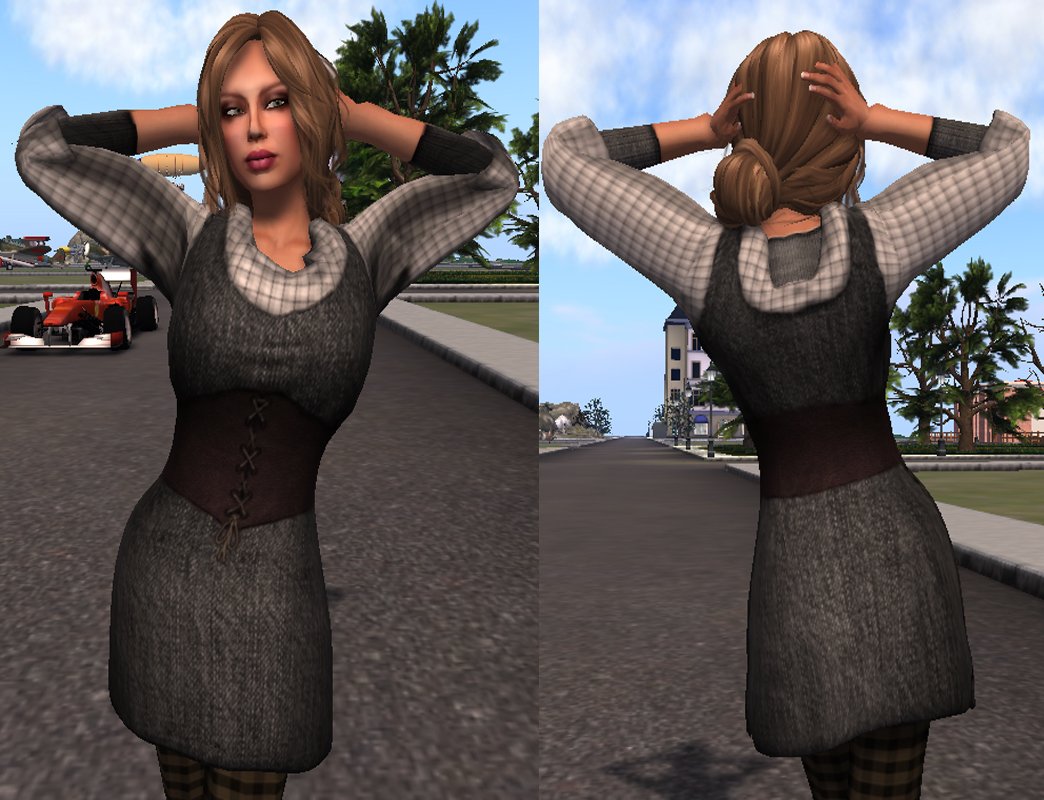
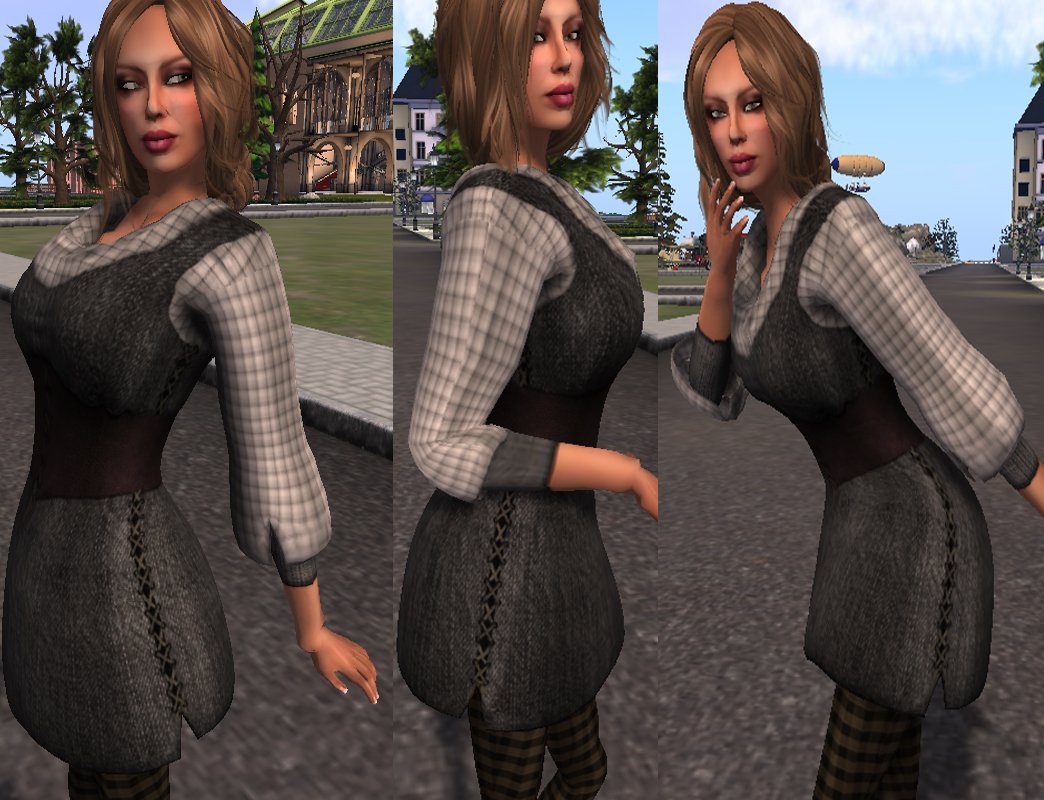
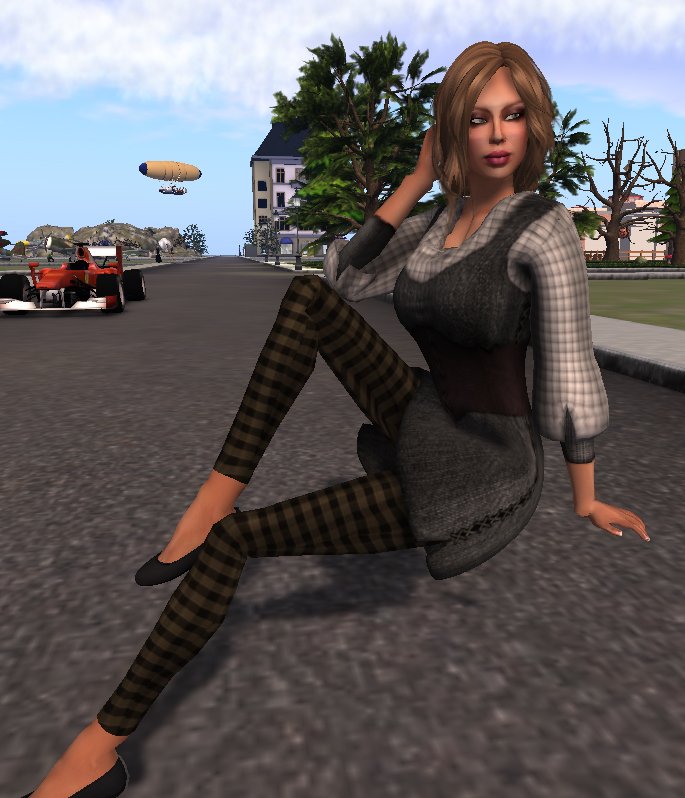
Here is a peasant tunic I have been working on. It is one piece, and it is the equivalent to 6 prims. I want to play now with a mesh underskirt to see if that will work well for me, or if I will use a flex prim underskirt as I have before under sculpties. I also want to make boots, and perhaps an apron to go with it.

I had used ZBrush exclusively to make sculpties and came to love the ability of that program to handle fine detail and texturing. However, ZBrush will not export to collada, so I had to export as an .obj and import that .obj into Blender, which will export to collada. ZBrush does not handle rigging and weighting well at this point, so getting my clothing mesh to move with the avatar and weighting that movement must be done in another program. Blender does that quite well. Blender also handles UV maps much better than ZBrush.

All of this meant that I had to learn Blender. I have been working at that and also figuring out my process, my workflow or pipeline. Here is a very rough outline of what I have arrived at.

1. Make basic mesh in Blender. This permits me to rough out a very low poly form with perfect quads. I can extrude, select edge loops, add edge loops to areas where I want more detail, and so on.

2. Export basic mesh as an .obj and then import that into ZBrush. There I can subdivide the model to get good density to sculpt detail into and shape the mesh. Once I have done so, I move down to the lowest subdivision level and export that as an .obj.

3. Take the shaped mesh back into Blender as an .obj import. I then mark the seams where I want the UV map to be cut to make islands that will make sense to me. I unwrap the mesh and check out the UV map to make sure it is good. I then export the mesh again as an .obj, usually adding “UV mapped” to the name to avoid confusion.

4. Weight your mesh in Blender. At this point you can export the mesh as collada and set that aside, ready to take into Second Life.

5. Import the .obj UV mapped mesh back into ZBrush, and using the UV Master plugin I hit the “copy UVs” button. I then load up the subdivided mesh model I was working on and take the geometry down to the lowest level. I then open up the UV Master plug in again and hit the “paste UVs” button. This works very well!

6. Now I can texture it in ZBrush using that program’s fantastic tools at the highest subdivision level. When done, make a texture map from your polypaint, clone it, flip it vertically, and export it out.

7. Go into the test grid and import your collada model as weighted mesh and your texture. Put them together, and voila!

Mesh Open Beta Starts October 13!

Well the news it out! Jack Linden posted on the SL website that open mesh will officially start on October 13. You can go and read the blog here.

For a quick preliminary look at how to use Blender to export to Collada format and upload it to Second Life, have a look at Gaia’s excellent video on her Machinimatrix website. In that video she looks at general meshes and weighted meshes that can make mesh clothing or avatar parts move with your avatar skeleton.

On her website she also has excellent tutorials on how to use Blender to make sculpties if you are interested in that. There are also several other excellent Blender tutorials out there. Just google “Blender Tutorials” and choose what appeals to you.

From the thread in SL Universe, I was able to pick up some links to some websites that give you a basic primer in 3D modelling, a good place to start to pick up some of the key concepts and language. This basic understanding can be covered in an hour or so, and will make 3D programs a little less intimidating in their use of terminology.

The Guerrilla CG Project

A Modelling Ethic

I know there has been some anxiety about how mesh will impact on Second Life and content creators. Once we get into the open beta and can experiment, I think some of that anxiety will be lifted. A very simple program to learn is Google Sketch-Up and I would encourage people to have a look at it. I think it will be easier to use in some ways than building in world with prims.

Very few creators in Second Life can do it all. There are scripters, animators, builders, texture makers, sound specialists, and those with management, writing, machinima, DJ, and social event managing/hosting skills. All the skills are equally valuable and necessary to a rich SL experience for all of us. Find what you do and do it well!

A First Look at Mesh Import Using Blender

“Gaia” was a participant in the mesh import beta test, and she has posted a how to video on her website, Machinamatrix, on how to use Blender to create meshes and export them in the Collada 1.4 format which can be imported into Second Life.

On her website are tutorials and videos which will teach you how to use Blender from scratch, and how to make sculpties for Second Life. I am not sure if sculpties will become obsolete, or if there will be some cases where sculpties are preferrable to mesh.

I was very excited to watch her excellent video which shows some of the possibilities. You can rig body parts to attach to your avatar that can move along with your body parts. This will revolutionize clothing. You can create long sleeves that will move with your avatar’s arm, jackets and vests that move with the body, and more! You can make your own avatar!

I wonder if one can make objects that can be rigged for animation and animated without attaching them to your avatar. I look forward to learning more about mesh import, and as I learn more, I will keep you posted here.

NDA (Non-disclosure Agreement) lifted on mesh import beta!

Jack Linden posted in a blog today that the non-disclosure agreement is officially lifted on mesh import beta testers. You can read his blog entry here.

This means that those involved in the closed beta test can now officially talk about it, answer many questions we all have about programs they use, polygon limits, texturing, rigging and animation and much more. The blog links to a You Tube page showing 6 videos demonstrating mesh.

I have a thousand questions to ask! Well, ok, maybe five or six questions. I will be watching blogs for more information where we can find reports from beta testers and opportunities to ask questions.

Jack Linden indicated that open beta testing will come soon, and it will involve the use of a viewer made for that purpose and it would access a test grid and not the main grid. He promised in his blog entry more information in two weeks time, “The plan is to blog again in two weeks, when we’ll announce when the open beta will be available and talk more about the development process and the remaining work to be done.”

News from SLCC 2010, Mesh Import Still in the Works.

I did not see Philip Rosedale’s keynote presentation in person, but I have been able to pick up a few key things he announced at the Second Life Community Convention 2010 in Boston.

Of course my primary interest was to find out if he said anything about mesh import. Daniel Voyager was kind enough to present a brief synopsis of Philip’s speech. Apparently mesh import is still in the works and the plan is to have it in open beta by the end of the year. I am excited to hear this, but we do know that deadlines can be missed and postponed. Perhaps if we all write a nice letter to Santa Philip and mail it off to Linden Lab we might hope to have a little surprise under our Christmas trees in Second Life. Please Philip, tell me, “Yes Vivienne, there is a Santa Claus.”

Also of interest was the announcement that the Teen Grid will be closed. 16 and 17 year olds will be permitted to access the main grid, but at present time there is no access planned for those aged under 16. There was mention of some discussion with educators about potential solutions and applications for younger people.

There was more talk of fighting lag, increasing the number of avatars that can be in one place at any given time without crashing the region. They have reduced crashes on Viewer 2.0 by 50%, and working on improving sim crossings and fixing group chat problems are high priority at present.

A video of Philip’s speech has just been made available here.

ZBrush 4 is Out, and It’s Amazing!

I received my email yesterday with the instructions and links to upgrade to ZBrush 4. One of the things I like about Pixologic, the makers of ZBrush, is that they have given me free upgrades since I purchased version 3.1 a couple of years ago.

I am drooling over some of the new features. I cannot wait to play with Alpha Roll, available under the stroke pallet to modify your brush using the Roll and the Roll Distance sliders. You can load up an alpha, and lay it down in sequence to create rope or other interesting designs, and as you change directions, so does the alpha you lay down. See the video on YouTube. The Move Elastic brush looks great. As you push and pull the mesh about to make a shape, the polygons can get stretched unevenly, which negatively impacts on texturing your sculpty. The Move Elastic brush keeps the vertices more evenly distributed.

Not all of the new features will be able to be used to make sculpties, such as Shadowbox. Shadowbox gives you three planes on which you mask out a shape, and the mesh is created according to where they intersect on each plane. I experimented with resolution, til I was able to get to just over 1000 active points, and tried to export that using, but unfortunately Sculpty Maker choked on it and did not create a sculpt map. Perhaps someone else will have more success playing with it, but I suspect that this will not be a useful feature until (if and when) mesh import is implemented in Second Life. However, I was able to use Shadowbox to make a form, append a properly initialized sphere for sculpty making, and then use the ProjectAll button on the subtool menu to make it form to the shape created in Shadowbox. After then deleting the Shadowbox, the new mesh was successfully exported by Sculpty Maker to an uploadable sculpt map.

ZBrush is one of the lower priced 3D modelling packages and it permits you to directly paint and transfer textures onto your model and then make a texture from it that you can tweak in Photoshop or Gimp and upload to Second Life. Professional 3D modelling packages can cost $3,000 plus. ZBrush 4 costs around $600 US, but will go up to about $700 US in about a month, so if you are interested check it out now. There is a free trial of 30 days. Before spending the money, I would strongly encourage you to take advantage of the free trial. There is a bit of a learning curve with it, but the interface is still more intuitive than Blender and there are many excellent free tutorial videos on the Pixologic website and YouTube.

ZBrush exports models in .obj format. To be able to export to sculpty, you need to download Sculpty Maker from Shiny Life. There are videos available on Shiny Life that show you how to use ZBrush to make sculpties and texture them. These videos turned me on to ZBrush and made me decide to try out ZBrush.

On Shiny Life, you can also find some sculpty making in ZBrush tutorials by Pan Bunny. They are excellent, and even as one who has used ZBrush for some time I picked up a couple of things I did not know!

I would write more, but I feel the need to play with ZBrush 4!

Future of Mesh Import Uncertain with Firing of Qarl Linden

I read with dismay today on New World Notes about the firing of Qarl Linden, Karl Stiefvater. Karl disclosed his firing on his website, “Well, linden lab cut me loose today. They’ve been hinting at it ever since the layoffs last month. Try as i might i wasn’t able to change their minds. Honestly, I’m completely baffled at the decision, as are all my coworkers (and my boss, and…)”

It is unclear why he was fired. Tateru Nino posted a quote from his last performance review of July 2010 on Dwell on It indicating that the man is a software genius doing a great job. “Can I say how invaluable you are to the render team? You burned through a large number of crashes and critical rendering bugs. Without a lot of direction, you completed the feature/gpu table on S3 project, thought through a LOT of the complexities, and produced something incredibly useful. You enabled RenderDivisor to work on low end hardware (even if the hardware couldn’t take advantage of it in the way we hoped.). You did a ton of work to get mesh ready for public beta. You’ve fought long and hard trying to get Apple to fix their drivers while seeing if we can handle our textures better. And that was just this quarter (And you did all this while the company was undergoing a major reorg and giving us TONS of direction changes). You consistently brought things to fruition that worked well the first time. I love working with you. As does everyone on the team. You rocked it. 23 July 2010 – Q210 Manager Review” Apparently the source of this quote is Qarl’s website, www.qarl.com.

From New World Notes, “Qarl was a leading force behind Second Life sculpties, a groundbreaking building method, and more recently, COLLADA-compatible meshes, a feature currently in closed Beta. Meshes were promised to come to Second Life proper this quarter, but with Karl gone from Linden Lab, it’s unclear what that status is.”

I was hopeful that perhaps an open beta of mesh import was imminent when not long ago Linden Lab lifted the non-disclosure agreement permitting some information from those in the closed beta test of mesh to slip out. See my previous entry here.

The end of Q2 has come and gone, and Linden Labs has been silent on the topic of mesh import. With the firing of Qarl Linden, I am now not only thinking that mesh import will not come soon, but wondering if it will come at all.

Philip, it is time to tell us something! Don’t leave us hanging. Too many of us are excited about the potential of mesh import.